

Why You Need to Know How to Check DNS Leak
Let’s start with a simple one. DNS leak is a situation where your DNS queries (that is, the list of sites you visit) become visible to your ISP or third parties, even if you are connected to a VPN. Imagine: you ordered an armored car for a trip to the city, thinking that no one would know where you were going. But every time you ask for directions, you loudly announce the route to the whole area. This is the DNS leak.
Knowing how to check DNS leak means understanding if your requests are leaking out. This is an element of digital hygiene.: how to brush your teeth morning and evening, just for your anonymity on the Internet. Verification is needed to make sure that the VPN is working correctly and leaves no gaps.
It is especially important to understand how to check DNS leak if you:
- use a VPN for privacy or block circumvention;
- Connect to public Wi-Fi in a cafe, hotel or airport;
- you work on a corporate network where they can impose their DNS settings.
For more concrete information about DNS leak feel free to check our “What is DNS Leak” article.
Understanding the Basics Before You Learn How to Check DNS Leak
To understand how to check DNS leak, you first need to understand what DNS is and why it is needed. DNS is the “Internet phone book”. We type the site name in the browser, for example example.com , and DNS translates it into a numeric IP address that computers can understand.
The problem is that every DNS query is fixed. Even if the site itself opens via HTTPS or VPN, the list of addresses you visit remains visible. It’s as if the postman doesn’t know the contents of your emails, but sees exactly where you’re sending them.
That’s where the illusion comes in.: you think that the VPN has hidden everything, but in fact, without checking, you don’t know where DNS queries go. DNS leak breaks this protection — websites, providers, or even a Wi-Fi administrator can see your query list. That’s why it’s so important to be able to not only use a VPN, but also understand how to check DNS leak.
Common Situations When You Must Know How to Check for DNS Leaks
There are situations in which it is especially critical to know how to check a DNS leak.
- Free or unreliable VPNs. They often encrypt only part of the traffic and do not touch DNS queries. You seem to be protected, but the provider still sees your list of sites.
- Open Wi-Fi networks. In a cafe, hotel, or airport, network owners can slip their DNS servers on, even if you have a VPN enabled. This is a classic leak scenario.
- WebRTC in browsers. This technology for video calls and P2P connections can directly expose IP and DNS by bypassing VPN. Without checking, you won’t even notice it.
- Split tunneling and OS errors. Sometimes some applications work through a VPN, and some work directly. And if DNS queries fall into the “direct” part, the leak is guaranteed.
In all these cases, verification is not a luxury, but a necessity. Knowing how to check DNS leak helps you control the situation and understand if your VPN is really doing what you’re paying it to do.
How to Check DNS Leak Using Online Tools
The easiest way to figure out if there is a leak is through online tests. You don’t have to be a tech guy here, everything is done in a couple of clicks.
- dnsleaktest.com. When you visit the website, you will see two verification options: Standard and Extended. The first one does a quick check and shows which DNS servers your traffic is going through. The second one (Extended) runs several consecutive queries and reveals hidden inconsistencies. If you see your provider’s DNS instead of VPN servers, it means you have a DNS leak.
- browserleaks.com. A more detailed tool. It shows not only DNS, but also a bunch of related information: IP, WebRTC requests, geolocation. To check, just open the DNS section and compare who exactly is serving your requests.
- Interpretation of the results. The most important thing is to understand who you see in the results. If there are ISP servers listed there, then the VPN failed. If the DNS of the VPN provider or private resolvers are displayed, the protection works. Therefore, the ability to use such services is a key step in how to check DNS leak.
How to Check DNS Leak with Command Line Tools
Online tests are convenient, but sometimes a more “manual” approach is needed. Especially if you want to double-check the results. Command utilities will help here.
- nslookup (Windows). Open the command prompt and type nslookup example.com . The response will indicate which DNS server served the request. If this is the provider’s server, and you have a VPN enabled, this is an alarming signal.
- dig (Linux and macOS). On Unix systems, the dig command is used. example.com . It shows the full path of the request, including the servers it passed through. It’s a great way to check where your DNS queries are actually going.
- Comparison of IP addresses. To be sure, compare the IP from the utilities with the public IP (via whatismyip.com ). If the DNS server and your public IP are from different “worlds” (for example, the VPN is in the Netherlands, and the DNS server is at your ISP in Moscow), then there is a DNS leak.
| Tool | Platform | Purpose |
|---|---|---|
| dnsleaktest.com | Web browser | Quick and extended DNS leak tests |
| browserleaks.com | Web browser | DNS + WebRTC leak detection |
| nslookup | Windows CLI | Manual DNS server check |
| dig | Linux/macOS CLI | Advanced DNS query testing |
| whatismyip.com | Web browser | Compare real IP vs. DNS server location |
How to Check for DNS Leaks on Different Operating Systems
Each operating system behaves differently, so the verification may vary.
- Windows. There is a common feature here: the system sends DNS requests to several servers in parallel to “speed up”. Verification is done through nslookup and online tests. If the VPN does not intercept all requests, a DNS leak occurs.
- macOS. It’s easier to check on a Mac: the system clearly indicates which DNS is active. Just go to System Preferences → Network → Advanced → DNS and see which servers are being used. After that, test it via dig or dnsleaktest.com .
- Android and iOS. On mobile devices, DNS queries often bypass the VPN, especially if the “Private DNS” feature is enabled (Android) or configuration profiles are used (iOS). To check, just run dnsleaktest.com in a mobile browser. If the provider’s DNS is on there, it means you have a DNS leak.
In all cases, there is one universal rule: if you want to know how to check DNS leak, always compare the expected (VPN servers) and the actual (test results).
How to Check for DNS Leaks in Browsers
Even if the VPN works perfectly, the browser can ruin the picture. And here it is important to know how to check DNS leak in browsers.
- Chrome, Firefox, Edge, Safari. Each browser has its own nuances. For example, Chrome and Firefox are actively promoting DNS-over-HTTPS (DoH). It seems to be fine — the requests are encrypted. But the problem is that they can go past the VPN, directly to the public DNS servers. As a result, there is an inconsistency: traffic is through VPN, and DNS is bypassed. It’s all checked simply: you go to dnsleaktest.com in the browser, you see whose DNS is “glowing” there.
- The impact of WebRTC. WebRTC is a browser—based technology for video calls and P2P. It can directly disclose your real IP and DNS, ignoring the VPN. To check if you have such a leak, you need to run a test on browserleaks.com . If your real IP/DNS appears there, it’s a signal that WebRTC should be disabled or restricted.
- Private mode vs normal mode. Many people think that “incognito” is a shield from everything. But private mode does not protect against DNS leak. Moreover, sometimes the results may differ due to extensions or cache. Therefore, it is better to check both in normal and private mode to make sure that the problem is not hiding somewhere deeper.
How to Check for DNS Leaks in VPN Clients
A VPN seems to be supposed to automatically protect against leaks, but in practice, not everything is so simple. That’s why it’s important to know how to check DNS leak in the VPN client itself.
- Built-in DNS leak protection function. Many paid services have a separate check mark in the settings: DNS leak protection, Block outside DNS, or something similar. By enabling it, you can be more confident that requests will not go to the provider. But you still need to check the work with online tests.
- Comparison of different VPNs. Free VPNs almost never bother with DNS protection. But premium ones (NordVPN, ExpressVPN, Mullvad and others) often have their own private DNS servers. The difference is immediately apparent: for a free VPN, DNS leak is almost guaranteed, while for a paid VPN, protection is usually enabled by default.
- Testing after changing servers. Even with a good provider, different servers can behave differently. One can handle DNS correctly, the other cannot. Therefore, you need to check not only the VPN as a whole, but also the specific servers you are switching to.
How to Check DNS Leak in Corporate and Public Networks
Office and public networks are a separate story. It is important to know especially carefully how to check DNS leak, because administrators of such networks often impose their own rules.
- Corporate networks. In the office, the admin can force the system to use the company’s local DNS servers. Even if you have a VPN enabled, some of the requests may go directly to these servers. This is done for the sake of control, but there is a risk of leakage for you.
- Public Wi-Fi. In a hotel or cafe, the network owner can slip his DNS. You think you’re using a VPN, but in fact all your DNS requests go through the hotel router. It is checked simply: you run dnsleaktest.com . If the DNS of the network you are connected to is visible there, then the VPN failed.
- Case: There is a VPN, but DNS goes through a local server. Imagine that you are sitting in a hotel with a VPN. Everything seems to be working, the IP has changed. But you go to browserleaks.com — and you see that the DNS goes through the local server of the hotel. This is a classic example of a leak on a public network. Solution: enable the Block outside DNS setting in the VPN or force your own DNS to be set.
If you understand that you need a VPN but struggling to choose the best option which suits you feel free to check our ultimate comparison of the best VPN services to choose the best option for you.
Final Checklist: How to Check DNS Leak Correctly Every Time
In order not to get lost in the details, it is convenient to have a short algorithm at hand. DNS leak verification does not take more than 5 minutes, but it can save a lot of nerves and data.
- What to use:
- Online tools: dnsleaktest.com , browserleaks.com .
- Utilities: nslookup, dig.
- Comparative services: whatismyip.com to verify the real IP.
- Why check regularly:
- Even if everything is set up correctly once, OS, browser, or VPN updates can change routes. Public Wi-Fi and corporate networks often interfere too. Therefore, a test at least once a month is a simple habit of digital hygiene.
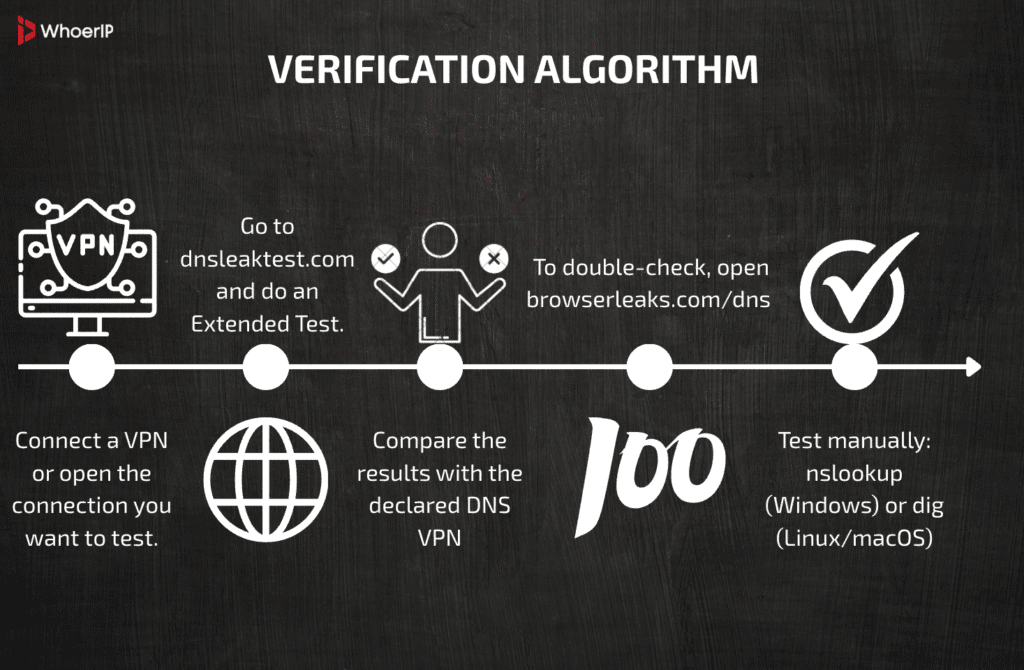
| Step | Action | Why It Matters |
|---|---|---|
| 1 | Connect to VPN or network | Define the environment to test |
| 2 | Run Extended Test on dnsleaktest.com | Detect DNS servers in use |
| 3 | Compare results with VPN DNS servers | Identify ISP or Wi-Fi interference |
| 4 | Cross-check on browserleaks.com/dns | Confirm no extra leaks appear |
| 5 | Use nslookup or dig if needed | Manual verification for accuracy |
| 6 | Repeat monthly or on new networks | Prevent leaks after updates or changes |
Conclusion
Knowing how to check DNS leak is not for “paranoids”, but for anyone who uses a VPN or wants to preserve privacy. DNS queries reveal your steps on the network, even with encrypted traffic, so verification is a way to make sure that security is working as intended. Online services and simple commands provide a quick answer: are your DNS queries safe or not. By doing such a check once a month and after changing the VPN server or Wi-Fi, you will eliminate the main weak point in the digital security chain.
Frequently Asked Questions
What is DNS leak?
A DNS leak happens when DNS queries (the websites you visit) bypass your VPN and go directly to your ISP, exposing your activity.
How to check for DNS leaks?
Use online tools like dnsleaktest.com or browserleaks.com to see which DNS servers handle your requests.
How to test DNS leak?
Compare the DNS servers shown in a leak test with your VPN provider’s servers. If your ISP’s DNS appears, you have a leak.
How to protect from DNS leak?
Use a VPN with DNS leak protection, switch to secure DNS protocols (DoH/DoT), or block outside DNS requests with firewall rules.
How to check DNS leak on a computer?
Run a leak test in your browser or use command-line tools: nslookup (Windows) or dig (Linux/macOS) to see which DNS server is queried.
How to check DNS leak on a phone?
Connect your VPN, open a browser on your phone, and visit dnsleaktest.com. If the DNS servers belong to your ISP instead of your VPN, you have a leak.